
shell cheatsheet
执行shell
./test.sh
sh test.sh
bash test.sh
chmod +x test.sh
基础语法
变量
a=1
echo $a

# parameter substitution
echo ${a}
echo ${a}dollar
echo "$a is 1" # 1 is 1

# just string ...
echo '$a is 1' # $a is 1

# command substitution
echo "I am in $(pwd)" # I am in /Users/FaiChou
echo "I am in `pwd`" # I am in /Users/FaiChou

# in bash all variables are global, if you want to set local variable:
function t() {
  local t=1
}

b=1
export c=2
set | grep 'b=' # b=1
env | grep 'b=' # no

set | grep 'c=' # no
env | grep 'c=' # c=2

$0 # scriptname or path+scriptname
$1 $2 ... $10 # arguments
$# # arguments counts
$? # last command output
source
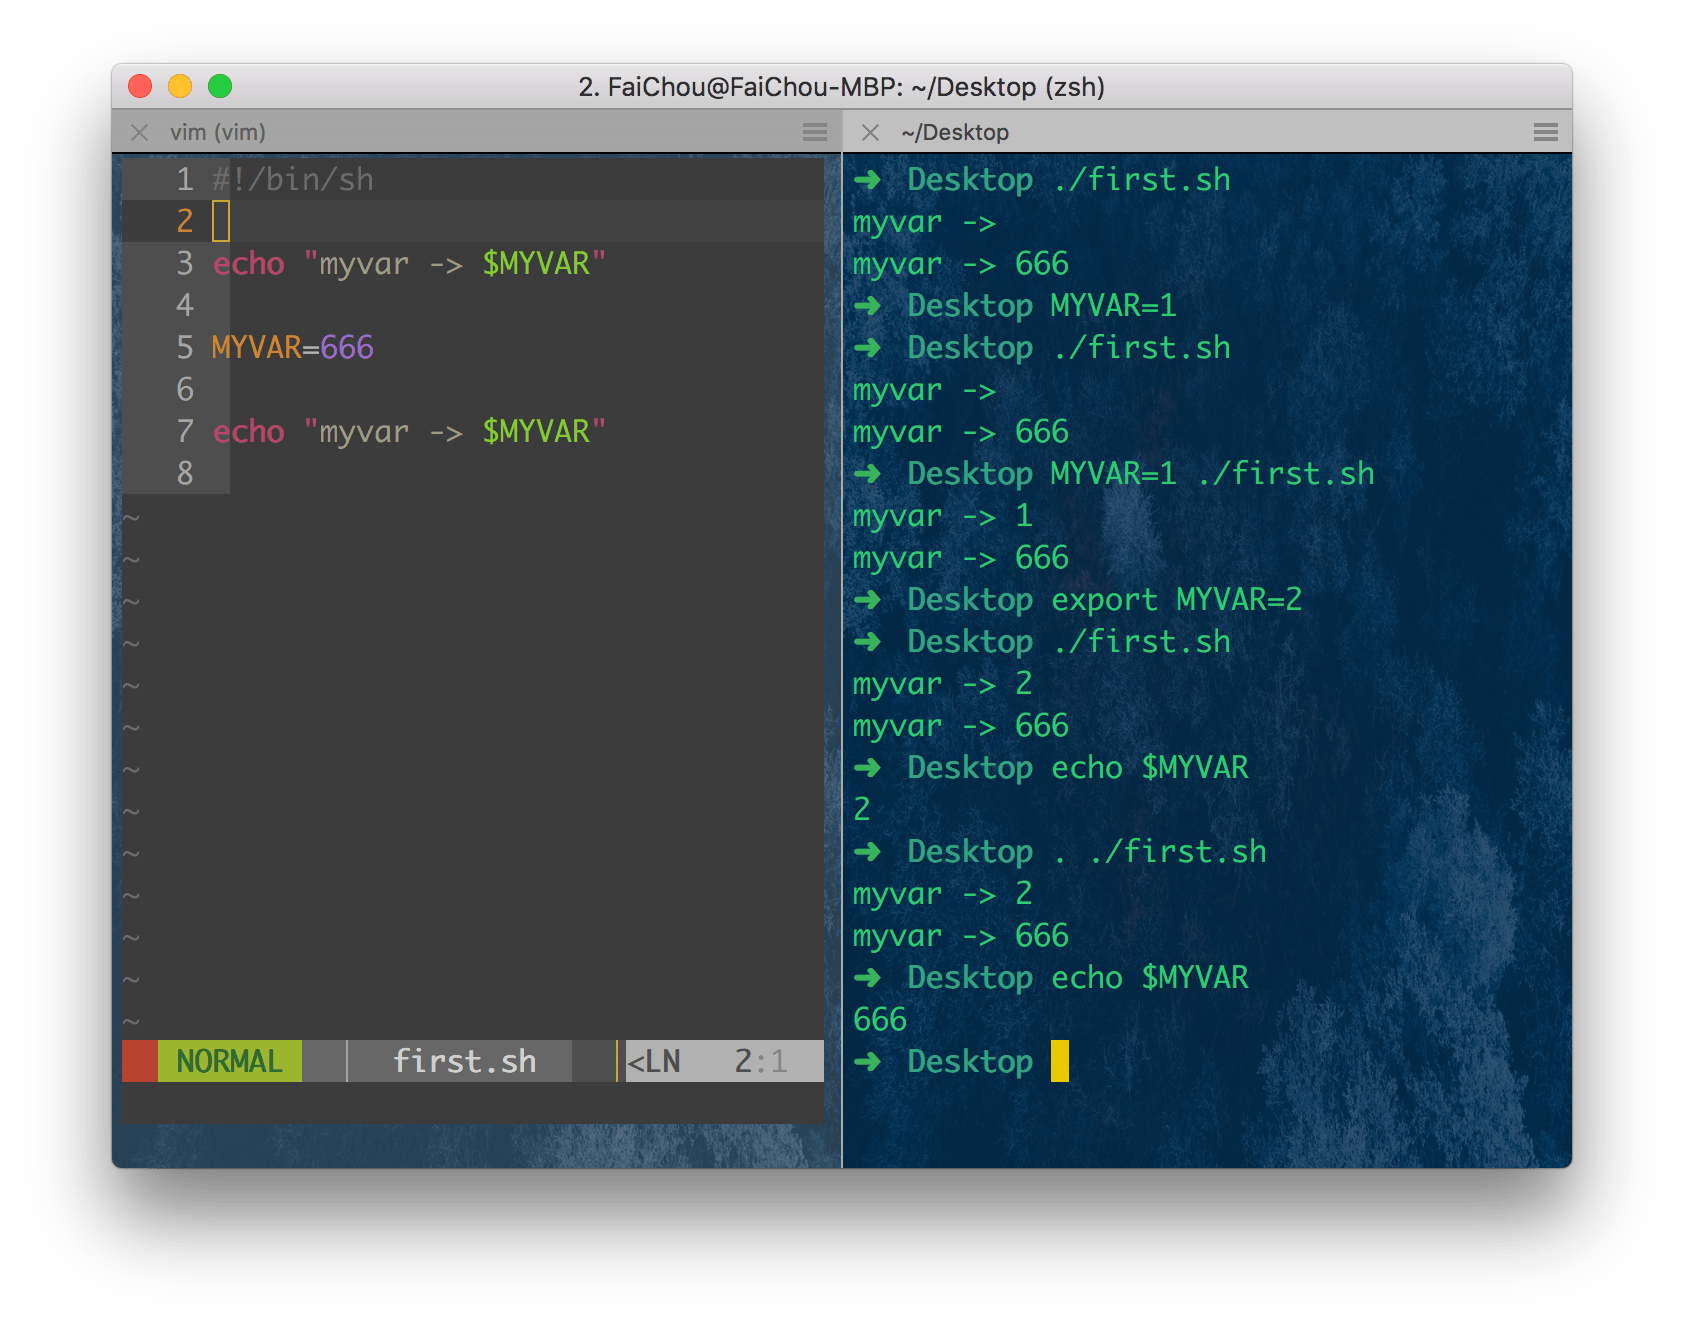
Once the shell script exits, its environment is destroyed. But MYVAR keeps its value of hello within your interactive shell.
In order to receive environment changes back from the script, we must source the script - this effectively runs the script within our own interactive shell, instead of spawning another shell to run it.
We can source a script via the ”.” (dot) command.
条件判断
[ $a = 1 ]
[[ $a = 1 ]] # both ok, recommend [[]]

[[ $a = 1 ]]
[[ $a == 1 ]]
[[ $a -eq 1 ]] # both ok, recommend ==

==, !=, >, <, -eq, -ne, -gt, -lt, -ge, -le # no >= and no <=

str=""
[[ $str == "" ]]
[[ -z $str]] # zero, means no define or empty string
[[ -n $str]] # not empty

str="hello"
[[ $str == he* ]] # support RegExp

[[ -e file ]] # file or dir exist
[[ -f file ]] # file exist
[[ -d dir ]]  # dir exist

[[ ! $str == h*llo || 1 == 1 ]] # support && and ||

if [[ exp1 ]]; then
  echo "c1"
elif [[ exp2 ]]; then
  echo "c2"
else
  echo "c3"
fi

if [[ exp ]]; then
  echo "c"
fi

for i in `ls`; do
  echo $i
done
Brace Expansion
for i in {1..100}
do
   #do something 100 times
done

wget http://domain.com/book/page{1..5}.html


cp /a/really/long/path/to/some/file.txt{,.bak}
$ echo a{d,c,b}e
ade ace abe串联命令
pipe
youtube-dl $1 -q -o - | ffmpeg -i - $2 # use pipe(|) send youtube-dl output to ffmpegPipe is used to pass output to another program or utility. Redirect is used to pass output to either a file or stream.
redirect
A > B # 将A的输出保存到B文件

A > TMP && B < TMP #  将A输出保存到TMP文件,再将TMP文件内容当做参数执行B

A | B # 就是上一条命令的等价。


ls exist.sh not_exist.sh 1>success 2>fail # stdout to success, stderr to fail

ls exist.sh not_exist.sh >success 2>&1 # stdout to success, stderr to output

command > /dev/null 2>&1 # ignore output but stderr to output

command &>/dev/null # same as above

command < file # same as cat file | command, but reduce once IO
其他命令
last command
$ mkdir abcdefghijklmn
$ cd !$ # auto complete abc...mn

$ cmd # cmd permission denied
$ sudo !! # expand last command
grep
$ cat file.txt
abcdef
hijklmn

$ grep abc file.txt
abcdef

$ grep -v abc file.txt
hijklmn

$ pip3 list | grep werkzeug -i # ignore case

$ grep ^GNU GPL-3 # start with GNU string
$ grep and$ GPL-3 # end with and string
$ echo "img/a.png img/b.jpg" | grep -oE "\/.*?\.(png|jpg)"
/a.png
/b.jpg\/.*?\.(png|jpg)使用lazy matching(惰性匹配)来匹配一行中所有/bla.png或/bla.jpggrep -o只输出匹配到的grep -E正则表达式grep -P使用 PCRE
-P —perl-regexp Interpret the pattern as a Perl-compatible regular expression (PCRE). This is highly experimental, particularly when combined with the -z (—null-data) option, and ‘grep -P’ may warn of unimplemented features. See Other Options.
Default GNU grep behavior is to use a slightly flavorful variant on POSIX basic regular expressions, with a similarly tweaked species of POSIX extended regular expressions for egrep (usually aka grep -E).
GNU grep also claims to support grep -P for PCRE, by the way. So no terribly special kind of grep required.
xargs
echo "a" | xargs rm # do blow things

for arg in read_input; do
    rm arg
done
sed gsed
$ brew install gnu-sed
$ which gsed
# /usr/local/bin/gsed

echo "a b\nc d"
# a b
# c d
echo "a b\nc d" | gsed 's/a/aa/g'
# aa b
# c d

echo "a b\nc d" | gsed -e 's/a/aa/g' -e 's/b/bb/g'

gsed -i '/HEADER_SEARCH_PATHS/c HEADER_SEARCH_PATHS = (\n"$(inherited)",\n"$(SRCROOT)/../../../ios/Pods/Headers/Public/**",\n);' tmp
# replace HEADER_SEARCH_PATHS to blabla..

$ cat tmp
./a
./b
./c/d

$ gsed -i "s/\.\///g" tmp
$ cat tmp
a
b
c/d

$ echo "1234.567.89" | gsed -r 's/([0-9]+)\.([0-9]+)\.([0-9]+)/\1, \2, \3/'
1234, 567, 89

$ echo "atestb" | sed 's/.*\(test\).*/\1/'
test使用圆括号匹配的示例: 圆括号括起来的正则表达式所匹配的字符串会可以当成变量来使用,sed中使用的是\1,\2 ..
$ cat my.txt
This is your cat, your cat's name is betty
This is your dog, your dog's name is frank
That is your fish, your fish's name is george
That is my goat, my goat's name is adam

$ sed 's/This is my \([^,&]*\),.*is \(.*\)/\1:\2/g' my.txt
cat:betty
dog:frank
fish:george
goat:adam
正则为: This is my ([^,]*),.*is (.*)
匹配为: This is my (cat), ...is (betty)
然后: \1就是cat,\2就是betty
awk
ifconfig | sed -n -e '/127.0.0.1/d' -e '/inet /p' | awk '{print $2}'

echo "a;b;c" | awk -F';' '{print $2}'
tr
echo 'a,b,c,d' | tr , '\n'
# a
# b
# c
# d
cut
$ echo "alkgarequire('../img/a.png') require('/img/b.png')" | cut -d "(" -f1-
# cut with (:
# 1: alkgarequire
# 2: '../img/a.png') require
# 3: '/img/b.png')

$ echo "alkgarequire('../img/a.png') require('/img/b.png')" | cut -d "(" -f2
'../img/a.png') require

$ echo "alkgarequire('../img/a.png') require('/img/b.png')" | cut -d "(" -f2-
'../img/a.png') require('/img/b.png')

$ echo "abc def [1233] hoa" | cut -d'[' -f2 | cut -d']' -f1
1233
head
# To show the first 10 lines of file
$ head file

# To show the first N lines of file
$ head -n N file

# To show the first N bytes of file
$ head -c N file
tail
# To show the last 10 lines of file
$ tail file

# To show the last N lines of file
$ tail -n N file

# Show all file since line 'num'
$ tail -n +num file

# Keep reading file until Ctrl + C:
$ tail -f file
find
find . -iname "*.jpg" # ignore case all .jpg .JPG
find . -type d # find directionaries
find . -type f # find files
find ./path/ -name '*.txt' | xargs grep 'string'
find . -type f -iname "*.html" -exec grep "<head>" {} \; # exec
find . -type f -iname "*.json" -execdir mv {} index.json \; # exec in dir
$ find . -type f -name "*.ts" -or -name "*.tsx" -or -name "*.js" | xargs grep "require(" > ~/Downloads/match.txtfind current direction recursively all ts, tsx, js file which contain require( line.
jobs
$ node server.js # run a server in foreground job

$ node server.js & # run a server in background job

$ nohup node server.js & # run a server as a deamon
kill jobs
使用 ps 查看进程:
$ ps aux | grep aria2
FaiChou          28815   0.0  0.0  4287496    840 s004  S+    1:33PM   0:00.00 grep --color=auto --exclude-dir=.bzr --exclude-dir=CVS --exclude-dir=.git --exclude-dir=.hg --exclude-dir=.svn aria2
FaiChou          28423   0.0  0.0  4301432    924   ??  Ss    1:30PM   0:00.02 aria2c --conf-path=/Users/FaiChou/.aria2/aria2.conf -D
$ kill -9 28423
使用 pgrep:
$ pgrep -l aria2
28423 aria2
$ kill -9 28423
使用 pkill:
$ pkill aria2使用 killall:
$ killall aria2pkill vs killall
What’s the difference between pkill and killall?
主要区别是 killall 会完全匹配名字,名字不对则不会杀死,而 pkill 不用完全匹配名字。比如以下:
$ pgrep -l abc
1234 abc
12345 abcd
123455 abcde
$ pkill abc
$ killall abc
使用 pkill 会杀死 abc abcd 和 abcde 三个进程,而 killall 只会杀死 abc 一个进程。
sips
之前博客里有学习过 convert 命令, 很强大的图片编辑转换工具, 配合 composite 处理图片简直不要太爽.
这两个命令都是很复杂, 有很多参数, 功能也丰富.
而 sips 是 mac 自带的简单图片处理工具, 对图片大小的裁剪, 转换图片格式等常用操作:
sips -s format png a.jpg --out c.pngngrok
端口转发, 免费方便:
- brew cask install ngrok
- ngrok -h
- https://dashboard.ngrok.com/user/login // 注册,获取token
- ngrok authtoken
// 添加token - ngrok http 8000 // 会开启一个
http(s)://randomstring.ngrok.io地址转发到localhost:8000
配置多端口转发:
~/.ngrok2/ngrok.yml:
authtoken: TOKEN
tunnels:
  first:
    addr: 3000
    proto: http
  second:
    addr: 3001
    proto: http
这样启动 ngrok start --all 就可以转发两个端口(3000和3001).
Mac
sudo spctl --master-disable # mac 允许所有来源
defaults write com.apple.finder AppleShowAllFiles -boolean true ; killall Finder
# 展示隐藏
defaults write com.apple.finder AppleShowAllFiles -boolean false ; killall Finder # 隐藏隐藏文件

$ lsof -i:8000 # 查看占有8000端口的进程
$ ps aux | grep QQ # 查看并匹配和QQx相匹的进程

$ du -hs * # list current dir file size
$ du -shc * # list current dir file size and list total size

# command info

➜  ~ which simpleServer
simpleServer: aliased to python -m http.server
➜  ~ which http-server
/usr/local/bin/http-server
➜  ~ command -V simpleServer
simpleServer is an alias for python -m http.server
➜  ~ command -V http-server
http-server is /usr/local/bin/http-server
➜  ~ type simpleServer
simpleServer is an alias for python -m http.server
➜  ~ type -a simpleServer
simpleServer is an alias for python -m http.server
➜  ~ type http-server
http-server is /usr/local/bin/http-server

# open server

simpleServer
http-server
serve

# lookup a command

man command
cht command # curl cht.sh/$1
tldr command


